Exploring the Arduino UNO
Learn all about the Arduino UNO, its features, and how to get started with this versatile microcontroller. Ideal for beginners in electronics and programming. Start your DIY projects today!
Discover the basics of the Arduino UNO, its features, and how to start your own projects with this versatile microcontroller. Perfect for beginners in electronics and programming.
The Arduino UNO is one of the most popular microcontrollers in the world of DIY electronics. Loved by hobbyists, educators, and professionals alike, this versatile board has become a staple for countless projects, from simple LED blinkers to complex home automation systems. If you’re new to electronics and programming, the Arduino UNO is an excellent starting point. In this guide, we’ll explore what the Arduino UNO is, its key features, and how you can start creating your own projects.
What is the Arduino UNO?
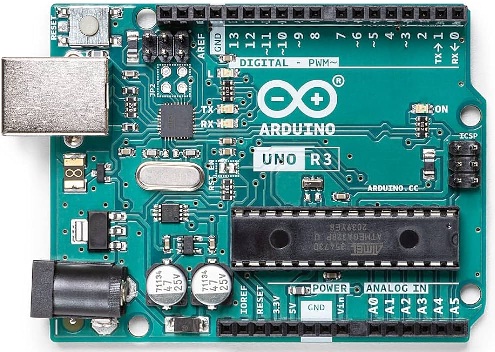
The Arduino UNO is an open-source microcontroller board based on the ATmega328P microcontroller. It was developed by Arduino, an open-source electronics platform that aims to make electronics and programming more accessible. The board features a set of digital and analog input/output (I/O) pins, which can be used to interface with various sensors, actuators, and other components.
Key Features of the Arduino UNO
The Arduino UNO comes with a range of features that make it an ideal choice for beginners:
- Microcontroller: ATmega328P, operating at 16 MHz.
- Digital I/O Pins: 14 pins, of which 6 can provide PWM output.
- Analog Input Pins: 6 pins for reading analog signals.
- Flash Memory: 32 KB, with 0.5 KB used by the bootloader.
- SRAM: 2 KB.
- EEPROM: 1 KB.
- Power Supply: Can be powered via USB connection or an external power supply (7-12V).
- USB Connection: Allows for easy programming and serial communication with a computer.
- Reset Button: For restarting the board.
Getting Started with the Arduino UNO
- Setting Up the Environment:
- Download the Arduino IDE: The Integrated Development Environment (IDE) is where you’ll write and upload code to your Arduino UNO. It is available for free on the Arduino website.
- Install the Arduino IDE: Follow the installation instructions for your operating system (Windows, macOS, or Linux).
- Connecting the Arduino UNO:
- USB Cable: Use a USB cable to connect the Arduino UNO to your computer. The board will be powered via the USB connection.
- Drivers: If necessary, install the drivers for the Arduino UNO. The IDE usually handles this automatically.
- Writing Your First Program:
- Blink: The “Blink” sketch is a simple program that makes an LED on the Arduino board blink on and off. This is a great way to test if your board is set up correctly.
- Code:

Upload the Code: Click the upload button in the Arduino IDE to transfer the code to your Arduino UNO.
Exciting Projects to Try with Arduino UNO
Once you’ve mastered the basics, the possibilities with Arduino UNO are endless. Here are a few project ideas to inspire you:
- Weather Station: Use sensors to monitor temperature, humidity, and pressure.
- Home Automation: Control lights, fans, and other appliances remotely.
- Robotics: Build a simple robot that can navigate obstacles.
- Wearable Tech: Create a fitness tracker or a smartwatch.
- Art Installations: Use LEDs and sensors to create interactive art.
Conclusion
The Arduino UNO is a powerful tool that opens up a world of possibilities in electronics and programming. Its user-friendly nature and extensive community support make it perfect for beginners and advanced users alike. Whether you’re looking to build simple projects or dive into complex systems, the Arduino UNO provides a solid foundation for your creative endeavors. Start your journey into the world of DIY electronics today and see where your imagination takes you!
By exploring the Arduino UNO, you can unlock the potential of microcontroller-based projects and bring your innovative ideas to life. Whether you’re a novice or an experienced maker, the Arduino UNO offers endless opportunities for learning and creativity. Happy tinkering!